Niels learns Rust 2 — Getting started with AVR Rust
This is part 2 in my journey to learn Rust by porting my embedded Java virtual machine to it. Click here for the whole series.
Installing Rust in a dev container
This first step is installing Rust, which is easy with rustup:
curl --proto '=https' --tlsv1.2 -sSf https://sh.rustup.rs | sh
But let’s do it in a way that’s stable and repeatable, using a dev container. A dev containers is a container that VS Code will spin up to build, run and debug your code. All development happens in the container, and the VS Code running on your desktop simply becomes a UI to talk to another instance of VS Code running in the container:
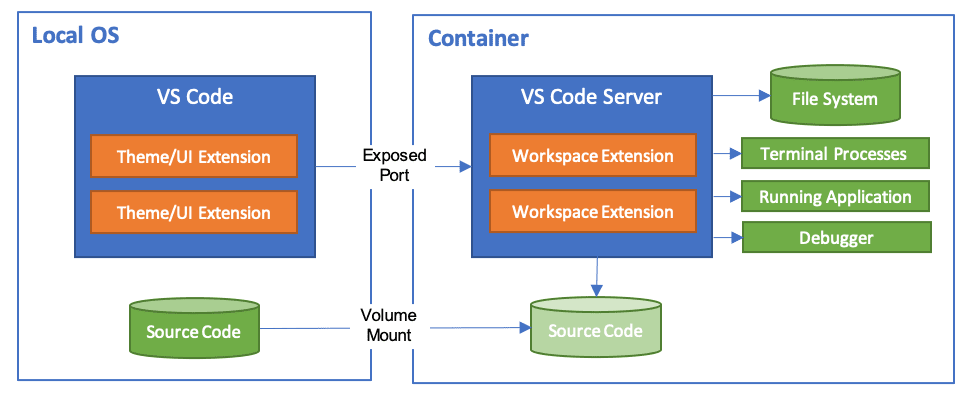 (source)
The advantage is better isolation and a well defined development environment. There’s no need to install tools locally that are only used for this project, and everyone downloading the repository can use the same container.
Dev containers are easy to create. The only thing you need is a .devcontainer/devcontainer.json file (.devcontainer.json also works) which contains the information VS Code needs to build the container.
You can either use a prebuilt image, or specify a Dockerfile to build your own. I’m doing the latter, and here’s what my devcontainer.json looks like:
{
    "build": { "dockerfile": "Dockerfile" },

    "customizations": {
      "vscode": {
        "extensions": ["rust-lang.rust-analyzer"]
      }
    }
}
The VS Code instance running in the dev container won’t have any extensions installed by default. You can either add them with a simple click from the list of locally installed extensions in VS Code, or have them added automatically by specifying them in the json file. The format needs to be <provider>.<extension> and the exact name, which isn’t very clear in the UI, is easily found in the ~/.vscode/extensions directory.
The Dockerfile is pretty simple as well:
FROM rust:1.78

RUN apt update
RUN apt -y install gcc-avr avr-libc default-jre

RUN cargo install cargo-generate
The Rust project provides a Docker image we can use, and for normal Rust development this may be enough. But the goal of this project is to build a Java VM for an embedded CPU, in this case the Atmel AVR ATmega 128, and we need to install some extra packages to work with it.
cargo is Rust’s build manager, it’s what dotnet is to .NET, sbt to Scala, go to Golang, etc. The last line installs a crate to allow it to generate new projects based on a template, which we will use in the next section.
Rust for the AVR
This gives use a working Rust installation. Cargo can create a new project for us and run it:
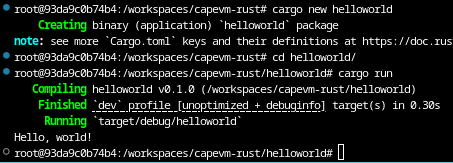
But this is builds for my local architecture, while we want to build for the Atmel AVR ATmega128.
Luckily, many people are using Rust to develop for the AVR, so ample resources exist to help, including this video, which points out a cargo generate template to setup a new project.
cargo generate --git https://github.com/Rahix/avr-hal-template.git
This will start an interactive flow to configure the template for our project. In this case there are just two questions: the project name, and the target board. I won’t be using an actual board, and run the VM in a simulator instead. But the Arduino Mega 1280 has the right CPU, so I’ll select that.
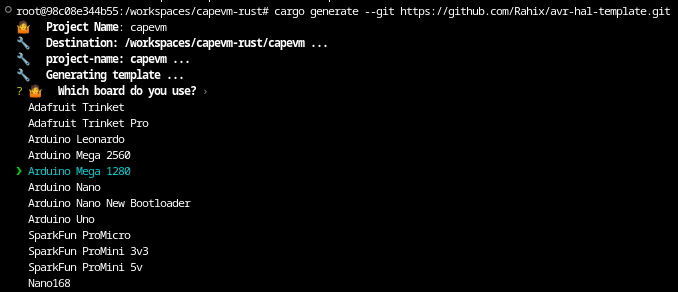
We now have a project configured for the ATmega128.
When we ask Cargo to build it, something interesting happens:
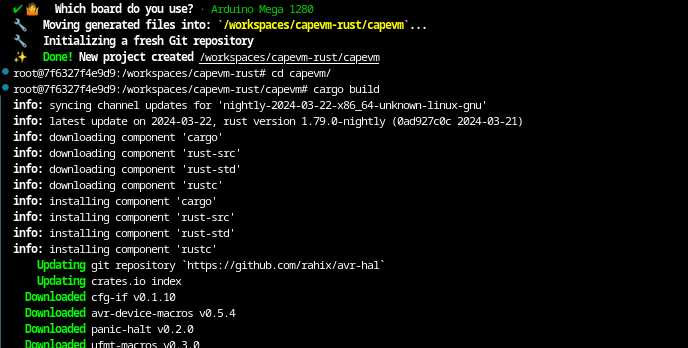
It is downloading a new version of Rust! A nightly build of version 1.79 while the Dockerfile specified 1.78. Why did this happen?
It turn out we can have multiple Rust toolchains installed side by side. The rustup toolchain list shows us the installed toolchains:

As you can see, the default in the dev container is 1.78, but when the same command is executed from within the project we created, this is overridden to a nightly build from 2024-03-22.
The reason this happens is that the template includes a rust-toolchain.toml that specifically requests this version:
[toolchain]
channel = "nightly-2024-03-22"
components = ["rust-src"]
profile = "minimal"
It seems a bit wrong to start the project on a nightly build, but the code generated by the template doesn’t compile with 1.78, so for now we will just leave this here and see if we can move to a stable version later.
Running the code
Cargo can also run the program, but when we try this in the current version, we get this error:

The template is configured to use a tool called ravedude to send the generated executable to the target device, but we don’t have a physical device, and will use a modified version of the Avrora simulator instead.
What happens when we do cargo run is defined in the capevm/.cargo/config.toml file in the generated project, which currently contains:
[target.'cfg(target_arch = "avr")']
runner = "ravedude mega1280 -cb 57600"
To run the generated Rust code in Avrora, I changed this to:
[target.'cfg(target_arch = "avr")']
runner = "java -jar ../avrora/avrora-beta-1.7.117.jar -monitors=memory,stack -single"
For now I’ve place the compiled Avrora simulator (a single .jar file) directly in the repository. This version of Avrora is extended with various probes to allow monitoring of the running program, but those details won’t be relevant until much later. Its source with all the modifications are in the original CapeVM repository.
AVR “Hello, world”
The template generated the following “Hello, world” equivalent for the AVR for us:
#![no_std]
#![no_main]

use panic_halt as _;

#[arduino_hal::entry]
fn main() -> ! {
    let dp = arduino_hal::Peripherals::take().unwrap();
    let pins = arduino_hal::pins!(dp);
    let mut led = pins.d13.into_output();

    loop {
        led.toggle();
        arduino_hal::delay_ms(1000);
    }
}
The main function’s signature, fn main() -> !, is interesting: the ! return type indicates the function never terminates.
This is enforced by the #[arduino_hal::entry] attribute, in code that is still beyond me. One of the nice things about Rust is that you can “F12” (Go to Definition) into almost anything to see it’s implementation, and the arduino_hal::entry contains this bit of code where syn::Type::Never(_) is the ! return type:
    // check the function signature
    let valid_signature = f.sig.constness.is_none()
        && f.vis == syn::Visibility::Inherited
        && f.sig.abi.is_none()
        && f.sig.inputs.is_empty()
        && f.sig.generics.params.is_empty()
        && f.sig.generics.where_clause.is_none()
        && f.sig.variadic.is_none()
        && match f.sig.output {
            syn::ReturnType::Default => false,
            syn::ReturnType::Type(_, ref ty) => matches!(**ty, syn::Type::Never(_)),
        };
This makes a lot of sense for most applications for embedded CPUs. Since there is no OS, there’s really no way for the program to terminate. Something has to keep running on the device. If there’s really nothing left to do, the best thing to do is put the device to sleep and wait for a trigger to wake it up.
The loop here endlessly toggles a single pin, but since we don’t have a real board, there’s no way to test it yet. We can run the code in the simulator, and Ctrl-C to stop it, after which Avrora will print some information on what the program has done, based on the -monitors we enabled in config.toml:
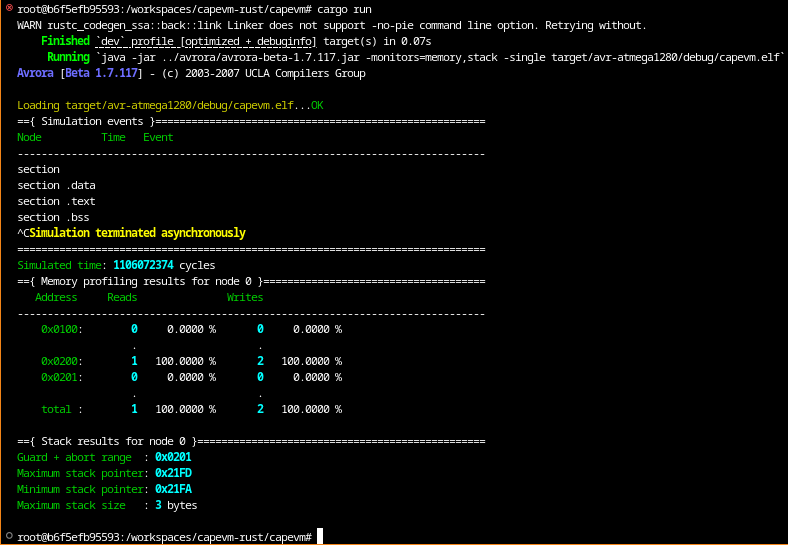
Great, it runs! But the output is not very useful yet.
The final goal is to build a JVM that will compile to native code and run and validate several benchmarks to measure its performance. For this, we will need much more detailed output, so the next post will be on how to add debug prints and other instrumentation.
The state of the code at the end of this step can be found here on Github.
Tags: [rust]
