Niels learns Rust 4 — Three different ways make the VM modular
This is part 4 in my journey to learn Rust by porting my embedded Java virtual machine to it. Click here for the whole series.
The original version of the VM was a modified version of the Darjeeling virtual machine. It was setup in a very modular way, and can be easily compiled with different sets of components enabled.
These components offer various sorts of functionality such as wireless reprogramming, access to the device UART, the Java base library, etc. The research project it was used in was on orchestrating networks of heterogeneous Internet-of-Things devices. For this project it made sense to make even the Java virtual machine itself an optional component, so that we could build a version for the smallest devices that couldn’t execute Java code but still participate in the network.
Project layout
So before we start building the VM, let’s setup the project layout first. The goal is to have components that can be optionally included when the VM is built, based on some configuration option. Each component should be able to register callbacks for a number hooks exposed by the core VM to initialise the component, allow it to interact with the garbage collector, to receive network messages, etc. At this stage we will only define one hook: init(), which will be called on startup.
To illustrate the different options, let’s start with two components:
jvmwill contain the actual Java virtual machineuartwill contain code to control the CPU’s UART (universal asynchronous receiver / transmitter)
The project layout will look like this:
.
├── avrora.rs
├── main.rs
└── components
    ├── mod.rs
    ├── jvm
    │   └── mod.rs
    └── uart
        └── mod.rs

4 directories, 5 files
Rust uses modules to scope things hierarchically, which can be defined in three ways:
- a
mod modname { ... }block, - a
modname.rsfile, so our project has a module namedavrora, - and a subdirectory with a
mod.rs, which defines a module named after the subdirectory. Here we havecomponents,components::jvm, andcomponents::uart.
Compilation starts with main.rs, or lib.rs for libraries. Modules in a different file or directory must be explicitly included in the project, otherwise they are simply ignored. In this case the lines mod avrora; and mod components; import the avrora and components modules, which are then available throughout the crate.
The goal is to optionally include components::uart and components::vm, depending on whether they are enabled according to some config setting, and to call their init() functions if they are.
I considered three ways to do this, that each taught me some interesting Rust features, so let’s explore all three:
Option A: build.rs
Cargo has the option to run a Rust script, just before the code is built. The script has to be called build.rs and placed in the project’s root directory.
We can use this to generate the code required to import the selected components. We will store the setting controlling which components are enabled in a separate config file, vm-config.toml, also in the project’s root:
[capevm]
components = [ "jvm" ]
In this example, we’ve enabled the jvm, but not the uart component. Our build script should then produce a file containing the following code:
#[path = "/home/niels/git/capevm-rust/capevm/src/components/jvm/mod.rs"]
mod jvm;

pub fn init() {
    jvm::init();
}
Since Rust ignores code that isn’t explicitly imported in the project, only the jvm module will be included in the final build, and the uart module will be skipped.
The generated code is just a temporary file that shouldn’t be under source control, so we will generate it in Cargo’s output directory and include it from components/mod.rs, which now contains just a single line:
include!(concat!(env!("OUT_DIR"), "/enabled_components.rs"));The #[path] attribute in the generated code is necessary because module imports are relative to the location of the file doing the import, but the the include! macro in Rust works differently from the #include preprocessor directive in C. The included code is not simply pasted into a file, but parsed according to it’s source location, which in this case is the Cargo output directory. Without the #[path] attribute telling Rust the component is in a different location, we would get the error below:

The complete build script looks like this:
extern crate toml;

use std::fs;
use std::path::Path;
use toml::Value;

fn main() {
    println!("cargo:rerun-if-changed=build.rs");
    println!("cargo:rerun-if-changed=vm-config.toml");

    let manifest_dir = std::env::var("CARGO_MANIFEST_DIR").unwrap();
    let out_dir = std::env::var("OUT_DIR").unwrap();
    let dest_path = Path::new(&out_dir).join("enabled_components.rs");

    let contents: String = fs::read_to_string("vm-config.toml").unwrap();
    let cargo_toml = contents.parse::<Value>().unwrap();

    let vm_components =
        if let Some(capevm_components) = cargo_toml.get("capevm")
                                        .and_then(Value::as_table)
                                        .and_then(|table| table.get("components"))
                                        .and_then(Value::as_array) {
            capevm_components.iter().filter_map(|v| v.as_str()).collect::<Vec<&str>>()
        } else {
            Vec::<&str>::default()
        };

    let mod_imports =
        vm_components.iter()
            .map(|name| format!(r#"
                #[path = "{manifest_dir}/src/components/{name}/mod.rs"]
                mod {name};"#, manifest_dir=manifest_dir, name=name))
            .collect::<Vec<_>>().join("\n");
    let mod_inits =
        vm_components.iter()
            .map(|name| format!("
                {}::init();", name))
            .collect::<Vec<_>>().join("\n");

    let generated_code =
        format!("{}

            pub fn init() {{
                {}
            }}", mod_imports, mod_inits);

    fs::write(dest_path, generated_code.as_bytes()).unwrap();
}
There are a few things to notice:
-
extern crate toml;Just like the main application, thebuild.rsscript can use external crates. They have to be declared inCargo.tomlas any other crate, but in a section called[build-dependencies]instead of[dependencies]. -
println!("cargo:rerun-if-changed=...");We can control when Cargo runs the build script (and several other things) by writing to standard output. Here, these two lines tell Cargo to rerun the build script if eitherbuild.rsorvm-config.tomlchange. -
std::env::var("CARGO_MANIFEST_DIR"): Cargo exposes several parameters of the build process to the script through environment variables. In this case we useOUT_DIRto determine where the generated file should go, andCARGO_MANIFEST_DIRto know the location of the components. -
unwrap(): Rust’s main way of error handling is by returning aResult<T, E>. This may contain either aTvalue or anEerror. Normally we should handle an error, or pass it on using the?operator, but if we’re sure no error can occur or don’t mind the code panic if it did,unwrapwill get the value out of theResult. -
.and_then(): The toml crate gave us aValueobject to represent the contents of the toml file that can be searched by name. This returns anOption<&Value>, which can beNoneif the name isn’t found. The.and_then()call allows us to string operations on Options if it contains a value, or keepNoneif it doesn’t. It’s sometimes called flatmap or bind in other languages.
Option B: Cargo features
A second option is using Rust features. This is much simpler, but it also has some downsides. We first declare a [features] section in Cargo.toml as follows:
[features]
default = ["jvm"]
jvm = []
uart = []
Each feature is simply a name with a list of dependencies. The default feature is included by default, together with any dependencies, recursively. In this example default depends on jvm, so this feature will be enabled, but uart will not be.
The named features can then be used in conditional compilation using the #[cfg(feature = "...")] attribute. Using this, we can implement components/mod.rs as follows:
#[cfg(feature = "jvm")]
mod jvm;
#[cfg(feature = "uart")]
mod uart;

pub fn init() {
    #[cfg(feature = "jvm")]
    jvm::init();
    #[cfg(feature = "uart")]
    uart::init();
}
The advantage of this approach is that it’s much simpler than the build script. Also, we can control the selected features from the commandline: --features="uart" enables the uart feature, and --no-default-features overrides the default feature.
A disadvantage is that we need to manually list all the components in components/mod.rs to import them if their feature is enabled. In addition, we currently only have the init() function that should be called for all enabled features, but this list of possible hooks will grow when we add things like garbage collection and networking as some components may want to listen for incoming messages or register their own objects on the heap.
It’s quite a hard coupling, and if the number of modules and/or hooks continues to grow, this approach could become hard to maintain.
Option C: features + the inventory crate
Which brings us to option C: the inventory crate. This gives us a way to reduce this tight coupling between the components and core VM. Unfortunately, it doesn’t work on the AVR, but it’s still interesting to learn about.
The crate allows us to define some datatype, register instances of it from one part of the code, and collect them in another. In our case, the datatype could simply be a struct containing a function pointer to init():
pub struct Component {
    init: fn()
}
The implementation of a component now looks like this:
pub fn init() {
    println!("jvm initialising...");
}

inventory::submit! {
    crate::components::Component{ init }
}
And the implementation of components/mod.rs becomes:
#[cfg(feature = "jvm")]
mod jvm;
#[cfg(feature = "uart")]
mod uart;

pub struct Component {
    init: fn()
}

inventory::collect!(Component);

pub fn init() {
    for component in inventory::iter::<Component> {
        (component.init)();
    }
}
The collect! macro creates an iterator we can use to loop over all the Component objects that were registered through submit!(). This iterator is initialised before we enter the main() function and without having to run any initialisation code ourselves.
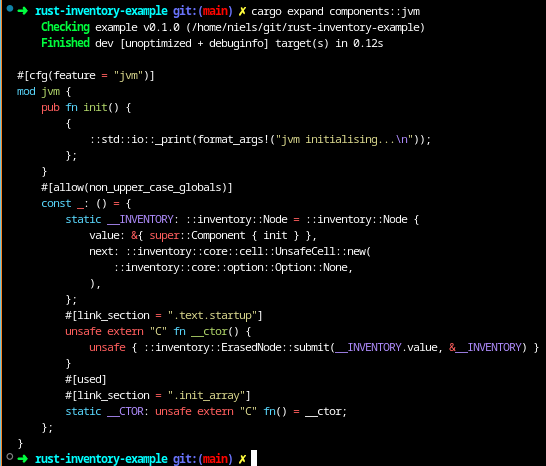
The magic that makes this work is in the submit! macro. It can sometimes be useful (or just interesting) to see what a macro expands to. We can do with a Cargo extension called cargo-expand. After installing it (cargo install cargo-expand) we can show the expanded source with cargo expand components::jvm:

The magic happens by placing some code in specific linked sections. Looking at the source of the inventory crate (which is pretty dense, but under 500 lines, half of which are comments), we see that the linker sections that will be generated depend on the operating system. .init_array on Linux, would be .CRT$XCU on Windows and __DATA,__mod_init_func on macOS. Each of these contain code that will be run before entering the main() function.
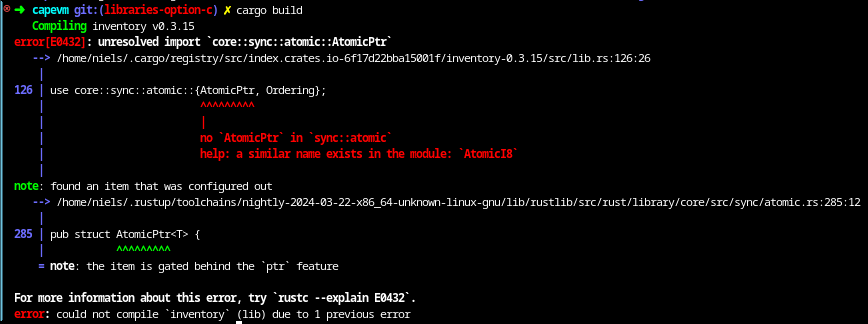
On the AVR, this kind of code goes into an .initN section, but unfortunately the inventory crate doesn’t work on the AVR:

The error is a bit cryptic, especially the the item is gated behind the 'ptr' feature part. The crate uses a type called core::sync::atomic::AtomicPtr, which is unavailable for some reason. When we have a look at the implementation of this type, it turns out it has a conditional compilation attribute that says #[cfg(target_has_atomic_load_store = "ptr")], which is only set if the platform supports atomic pointer operations.
The AVR doesn’t. It’s an 8-bit CPU and its pointers are 16 bit, so manipulating pointers always takes multiple reads or writes.
Comparison and decision
We could probably recreate what the inventory crate does by just copying part of the code and modifying it to remove the need for AtomicPtr. But there’s another reason why it’s ultimately not the best choice here.
It works by creating a linked list of static inventory::Node objects that the iterator can loop over. This means it’s using RAM, and even at only 4 bytes per object, on a device with only 4 KB RAM, we would prefer not to waste it on a static list that never changes.
So this leaves options A and B. Option A feels a bit more decoupled since the core vm code doesn’t need to know about the components, whereas in option B requires us to register each component with a corresponding feature flag.
A downside for option A is that each component needs to define an implementation for init(), even if there’s nothing to initialise, since the build script will always generate a call to it. The Rust compiler is quite good at removing dead code, so these will most likely be eliminated at compile time, but each time we add a similar hook later, which we will do for the garbage collector, each component needs to provide at least an empty implementation.
Since both the number of components and hooks will be limited, both options should work well. Option A has more moving parts, and less magic is always a good thing, I’ll go ahead with option B for now.
As usual, the state of the code at the end of this step can be found on Github. I’ve uploaded all three options:
Tags: [rust]
